Search

Megi's Crochet Patterns

Author

Megi's Crochet Patterns

I have tied my crochet blog with my mental illness blog. You can view both through this "about this blog" section. I hope you enjoy, whichever blog you are coming to see. :) My personal blog now includes a bible study with notes, thoughts, and questions you can engage with, joining the study at any time. https://thelifeofmegilin.wordpress.com

Reversible Ribbed Twist Hat

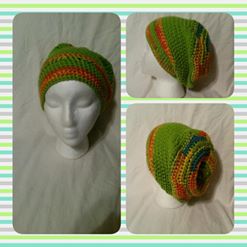
Many of you in the Yarn Wars group on Facebook wanted my pattern for this hat. I really just began to crochet one day with much frustration about cables. I couldn’t master it so I tore out all the hats I had tried and began to freestyle my work. This hat is the result. I am happy that so many of you loved it! So, without further ado, here is the pattern from my memory. I hope it makes sense and that your hat turns out great! I wish you luck, it has been a long time since I have written a pattern.


You will need to know several U.S. terms and techniques:

Magic Ring

FPDC – front post double crochet

BPDC – back post double crochet

DC – double crochet

Slip stitch

Chain stitches

How to work in the round
You will need the following materials:

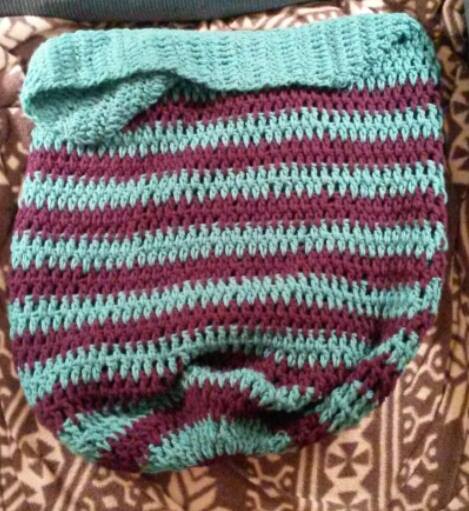
1 skein/ball of Worsted weight #4 yarn (I used Hobby Lobby’s yarn “I Love This Yarn” in metallic ‘Razzleberry’) 252 yards

A size G hook, my G was a 4.5mm (I know hook sizes are not universal) This should fit a child/teen up to an average adult sized women’s head))

Yarn needle

Scissors

*According to the method for sizing [2(πr)] this hat should measure 18-20″ at circumference. The radius should measure just about or right at 3″ when you reach your 70 stitches at your increase. If you need a smaller hat, just make less increasing rounds and make sure to follow the formula and your measurements.*
Let’s get started, shall we?
Make a Magic Ring and chain 2, *chain 2 does not count as a stitch here or throughout*

Round 1: work 10 dc in ring, slip st to chain 2 and pull tight (10)

Round 2: Chain 2 and work 2 fpdc around each dc of previous round, slip stitch to chain 2 (20)

Round 3: Chain 2, [work 2 fpdc around 1st fpdc from previous round, then 1 bpdc around next fpdc], repeat around from [to], slip stitch to chain 2 (30)

Round 4: Chain 2, [work 2 fpdc around 1st fpdc, 1 fpdc around next fpdc, then 1 bpdc around previous bpdc], repeat around from [to], slip st to chain 2 (40)

Round 5: Chain 2, [work 2 fpdc around 1st fpdc, 1 fpdc around next 2 fpdc, then 1 bpdc around previous bpdc], repeat around from [to], slip st to chain 2 (50)

Round 6: Chain 2, [work 2 fpdc around 1st fpdc, 1 fpdc around next 3 fpdc, then 1 bpdc around previous bpdc], repeat around from [to], slip st to chain 2 (60)

Round 7: Chain 2, [work 2 fpdc around 1st fpdc, 1 fpdc around next 4 fpdc, then 1 bpdc around previous bpdc], repeat around from [to], slip st to chain 2 (70)

Round 8: Chain 2, [work 1 fpdc around first 6 fpdc of previous round, then 1 bpdc around previous bpdc], repeat around from [to], slip st to chain 2

Repeat round 8 until you have desired length before brim/band.
Brim/Band:

Chain 2, [work 1 for in first post stitch, then 1 bpdc in next post stitch], repeat around from [to] until you reach your chain 2, slip stitch to chain 2 (repeat 4 times)

Finish off and weave in ends. TADA! You have your brand new, blingy hat. Enjoy.

Ribbed super warm mittens

image

It is becoming winter here in Ohio, USA. I made fingerless mittens for a friend of mine and then a pair for myself! So I used the basics of the wrist and thumb techniques and created my own super duper warm mittens!


You will need to know a few stitches:

sl-slip stitch

dc-double crochet

fpdc-front post double crochet

bpdc-back post double crochet

sc-single crochet

chainless foundation double crochet

ch-chain


Items you will need:

worsted weight #4 yarn

darning or yarn needle

scissors

H 8 crochet hook


note:ch2 does count as a st throughout.


Let’s get stared so you can stay warm and toasty this winter!

Row 1-Using your H hook, make 24 chain less foundation double crochets. Your beginning ch sts will count as your first st. Sl to top of ch 3 without turning. (You will sew the space together later. Or you may do it now if you wish.) You will now begin working in rounds throughout the rest of your mitten.

Round 2-8: ch 2 fpdc in each st around. Sl to ch2.

Round 9: ch 2. work 2 fpdc in first st, then work 1 fpdc in next 2 sts (this is the only increasing round) sl to ch2.

Round 10-15: ch 2. Work 1 fpdc in first st. Then 1 bpdc in next st. Repeat around. Sl to ch2.

Round 16: ch 3. Skip next 4 sts, work 1 fpdc in 5th st. (This makes the thumb hole. Work 1 bpdc in next st. Repeat fp and bpdc around in appropriate stitches.

Round 17: Sl into 2nd ch of ch 3. Ch 2. Work 1 Dc in 3rd ch of ch 3. Work fp/bpdc around as normal.

Round 18-27: ch 2. Work fp/bpdc around as normal.

fasten off and leave long tail.


Thumb:

attach yarn to any stitch in the hole opening.

round 1-3: ch2. Dc in each st around. Join with sl to top of ch 2.

round 4: ch 1. Dc in first st. Sc in next st. Repeat dc, sc around. Join to ch1.

fasten off and leave tail for sewing.

Now, where you left a tail, use your needle to weave your yarn in and out of each top st around the top of your mitten, and pull tightly until your mitten is securely closed. Now weave a knot in the top. Then weave your yarn through the top so it will not come loose. Repeat this with your thumb.


Enjoy your mittens! I would love to see pictures!

you may sell these mittens. You may not sell the pattern. Thank you.

The ULTIMATE Slouch Beanie

11866478_10207732771856132_8406140905659517788_n 11822510_10207733240267842_7721370472222509533_n

You have found the ULTIMATE slouch! You can work this in one solid or veregated yarn or two separate colors.

You will need:
2 colors Hobby Lobby “I Love This Yarn”
Scissors
Yarn Needle
Stitch Marker (This is worked in a continuous round)
J 6.00mm Hook
H 5.00mm Hook
G 4.5mm (for adults) or F (for children) 4.00mm Hook

Stitches you need to know:
HDC-Half Double Crochet
SC-Single Crochet
HDC DEC-Half Double Crochet Decrease
MR/C-Magic Ring/Circle

Let’s get started!

Round 1: Make MR/C, work 10 HDC in circle (10)
Round 2: Work 2 HDC in each HDC around (20)
Round 3: Work 1 HDC in first stitch, work 2 HDC in next stitch, repeat around (30)
Round 4: Work 1 HDC in each HDC around (30)
Round 5: Work 1 HDC in first 2 stitches, work 2 HDC in next stitch, repeat around (40)
Round 6: Work 1 HDC in first 3 stitches, work 2 HDC in next stitch, repeat around (50)
Round 7: Work 1 HDC in each HDC around (50)
Round 8: Work 1 HDC in first 4 stitches, work 2 HDC in next stitch, repeat around (60)
Round 9: Work 1 HDC in first 5 stitches, work 2 HDC in next stitch, repeat around (70)
Round 10: Work 1 HDC in first 6 stitches, work 2 HDC in next stitch, repeat around (80)

Change color and switch to H hook.

Round 11: Work 1 HDC in each st around (80)
Round 12: Work 1 HDC in first 2 stitches, work 1 HDC DEC over next two stitches, repeat around (60)
Rounds 13-18: Work 1 HDC in each HDC around (60)

Change Color

Rounds 19-20: Work 1 HDC in each HDC around (60)

Change Color and switch to G hook for an adult hat, or F hook for a child’s hat

Rounds 21-23: Work 1 SC in each stitch around

Change Color

Rounds 24-26: Work 1 SC in each stitch around

Change Color

Round 27: Work 1 SC in each stitch around

Finish off and weave in ends.

If you make a hat from this pattern, I would love to see your photos.
You may sell any items made from this pattern. You may not redistribute it as your own or sell the pattern. Feel free to share!

Rasta Tote Bag

20150807_233601

For this Rasta bag you will need the following supplies:
Red Heart Super Saver in Black, Yellow, Red, and Green.
Scissors
Yarn Needle
Stitch Marker
Size J 6.00mm Hook

You will need to know the following stitches:
CH-chain
SL-Slip Stitch
HDC-Half Double Crochet
MR/C-Magic Ring/Circle

Now, let’s get started!
You may slip stitch and chain 1 at the end of each round, or work continuously.

(In Black)
Round 1: Make MR/C, work 10 HDC inside. (10)
Round 2: Work 2 HDC in each stitch around. (20)
Round 3: Work 1 HDC in the first stitch, then 2 HDC in the next. Repeat around. (30)
Round 4: Work 1 HDC in the first 2 stitches, then 2 HDC in the next. Repeat around. (40)
Round 5: Work 1 HDC in the first 3 stitches, then 2 HDC in the next. Repeat around. (50)
Round 6: Work 1 HDC in the first 4 stitches, then 2 HDC in the next. Repeat around. (60)
Round 7: Work 1 HDC in the first 5 stitches, then 2 HDC in the next. Repeat around. (70)
Round 8: Work 1 HDC in the first 6 stitches, then 2 HDC in the next. Repeat around. (80)
Round 9: Work 1 HDC in the first 7 stitches, then 2 HDC in the next. Repeat around. (90)
Round 10: Work 1 HDC in the first 8 stitches, then 2 HDC in the next. Repeat around. (100)
Rounds 11-16: Work 1 HDC in each stitch around. (100)
Change colors
Rounds 17-20: With Red, work 1 HDC in next 33 stitches. With Yellow, work 1 HDC in next 33 stitches. With Green, work 1 HDC in last 33 stitches. (100)
Change color to Black
Rounds 21-22: Work 1 HDC in each stitch around. (100)
Change Colors
Rounds 23-26: With Yellow, work 1 HDC in next 33 stitches. With Green, work 1 HDC in next 33 stitches. With Red, work 1 HDC in last 33 stitches. (100)
Change color to Black
Rounds 27-28: Work 1 HDC in each stitch around. (100)
Change Colors
Rounds 29-32: With Green, work 1 HDC in next 33 stitches. With Red, work 1 HDC in next 33 stitches. With Yellow, work 1 HDC in last 33 stitches. (100)
Change color to Black
Rounds 33-34: Work 1 HDC in each st around. (100)
Now you will make the strap, do not finish off.

Strap:
In Black
Row 1: Ch 1, work 1 HDC in the next 12 stitches, ch 1, turn.
Rows 2-50: HDC in next 12 stitches, ch 1 Turn
When you have completed row 50, fold bag in half. Lay strap flat on top of itself so the end of the strap meets the top of the bag on the other side. SL in the 12 stitches along the top of the bag. Finish off and weave in ends.

You may sell any bags you make. Please feel free to share this pattern. You may not claim it as your own or sell the pattern. If you make a bag from this pattern, I’d love to see photos!

Crochet Thomas Hat

20150806_215108

This is a children’s cancer cap designed to look like Thomas the Tank Engine!
He is simple to make. Let’s get started!

For this hat, since it was a chemo cap, I used Hobby Lobby’s “I Love This Yarn.” It is worked in a continuous round.
You will need these colors: Blue, Gray, Red, Black, Yellow, and White.

Supplies:
G-4.5mm Hook
F-4.00mm Hook
Scissors
Stitch Marker

You will need to know these stitches and abbreviations:
Ch-chain
SC-Single Crochet
HDC-Half Double Crochet
MR/C: Magic Ring/Circle
ST-Stitch
SC Decrease

Hat: G
(In Blue)
Make a magic ring/circle, HDC 10 in circle. (10)
Rnd 1: Work 2 HDC in each st around. (20)
Rnd 2: Work 1 HDC in each st around. (20)
Rnd 3: Work 2 HDC in each st around. (40)
Rnd 4: Work 1 HDC in first st, then work 2 HDC in next stitch. Repeat around. (60)
Rnds 5-15 (10 rounds): Work 1 HDC in each st around.
Rnd 16: In Grey, work 1 HDC in each st around. OR 2 rounds SC. (2 rounds SC will give you the same width but make the cap fit a little bit more snug.)
Rnds 17-20 (4 rounds) F hook: In Red, Work 1 SC in each st around.
Fasten off and weave in ends.

Ear Flaps:
(In Red)
Attach yarn in 10th st from the center of the hat.
Row 1: SC in next 12 stitches, ch 1, turn.
Rows 2-3: SC in each stitch across. ch 1, turn.
Row 4: SC Decrease over first 2 stitches, SC across next 8 stitches, SC Decrease over last 2 stitches. Ch 1, turn.
Row 5: SC in each st across.
Row 6: SC Decrease over first 2 stitches, SC across next 6 stitches, SC Decrease over last 2 stitches. Ch 1, turn.
Row 7: SC in each st across.
Row 8: SC Decrease over first 2 stitches, SC across next 4 stitches, SC Decrease over last 2 stitches. Ch 1, turn.
Row 9: SC in each st across.
Finish off and weave in ends.

Face:
(In Grey)
Make MR/C. Work 10 SC in circle.
Round 1: Work 2 SC in each st around.
Round 2: Work 1 SC in first st, then 2 SC in next st. Repeat around.
Round 3: Work 1 SC in first 2 sts, then 2 SC in next st. Repeat around.
Round 4: Work 1 SC in first 3 sts, then 2 SC in next st. Repeat around.
Round 5: Work 1 SC in first 4sts, then 2 SC in next st. Repeat around.
Fasten off and leave a long tail for sewing.

Eyes (Make 2):
(In Black) Make MR/C, work 4 SC in circle.
(In White) Work 1 SC in each st around.
Fasten off, leave tail for sewing.

Smoke Stack:
(In Black) Ch 8. Work in first ch from the hook, SC in each of the next 7 sts.
Rows 2-4: Ch 1, turn. Work 1 SC in each st across.
Fasten off. Leave long tail for sewing.

Lights:
(In Black) Make MR/C, work 10 SC in circle.
Round 1: Work 2 SC in each st around.
Round 2 (In Yellow): Work 1 SC in each st around.
Fasten off. Leave long tail for sewing.

Bumpers:
In Black, Make MR/C, Work 10 SC in circle, join.
Fasten off. Leave tail for sewing.

Braids (In Black) Make 2:
Measure yarn to be 50″. Cut yarn. Make 9, 50″ strands.
Weave each strand into the bottom hole in ear flap, lining them up on each side.
Take 3 strands from each side and separate until you have 3 sets of 6 strands.
Begin braiding. I made 20 braids for my desired length, but you can make as many or not so many that you want. When you have reached the desired braid length, knot off at the end. Cut yarn so that you have about 3-4″ of fringe.

Now, assemble all your parts and embroider a mouth.
You have now created your Thomas hat. Enjoy!

If you make a hat from this pattern, I would love to see your photos.
You may sell any items made from this pattern. You may not redistribute it as your own or sell the pattern. Feel free to share!

The Perfect Beanie

beanie  11896008_10207737226367492_581310998177838374_n 11816820_10207716471208626_5860562358945936610_n 11828837_10207693821162389_1125654292240562013_n 11825883_10207664211702171_6025648246075001605_n 11825713_10207693820202365_5937146361400623743_n 11214245_10207703015752248_5497685024754483037_n

For this beanie, I used I Love This Yarn from Hobby Lobby. You can use any worsted weight yarn. This was for a cancer patient, so I used Hobby Lobby’s yarn for softness.

You will need:
Scissors
Yarn Needle
Adult: Sizes H (5.00mm) and G (4.5mm) hooks
Child: Sizes G (4.5mm) and F (4.00mm) hooks
Yarn

Stitches you need to know:
SC-Single Crochet
HDC-Half Double Crochet

You can do any number of color combinations you would like, or just a solid color. Above are photos of the different styles this hat can look like.

Let’s begin!

Using an H hook for adult, or G for child: Make a magic circle/ring. Work 10 HDC in ring. You will work in a continuous round.
Round 1: Work 2 HDC in each HDC of each stitch around. (20)
Round 2: Work 1 HDC in each HDC of each stitch around. (20)
Round 3: Work 2 HDC in each HDC of each stitch around. (40)
Round 4: Work 1 HDC in first stitch, then 2 HDC in next stitch. Repeat around. (60)
Rounds 5-15: Work 1 HDC in each stitch around. (60)

Switch to G hook for adult, or F hook for child.

Rounds 16-21: Work 1 SC in each stitch around. Fasten off and weave in ends.

Amigurumi Crochet Large Baby Doll In Pajamas

20150719_000818

You will need:
-I 5.5mm Crochet Hook
-F 3.75mm Crochet Hook
-Any two colors of worsted weight yarn
-Scissors
-Yarn Needle

Stitches to know, etc:
-Single Crochet (SC)
-Double Crochet (DC)
-Slip Stitch (SL ST)
-Increase (2 stitches in same stitch)
-Invisible Decrease (INV DEC)
-Magic Ring/Circle (MR/C)

In this baby doll, the body and head are crocheted as one piece and is 18″ tall. This is also worked in a continuous spiral. I used a light teal color in Red Heart Super Saver for the body, and an off white color in Caron One Pound. Stuff firmly as you go.

Body (Using F 3.75mm hook):
Row 1: Make a MR/C, ch 1, work 8 SC in the ring/circle and pull tight so that the hole closes.
(You can crochet your tail into your work or sew it in later.) Form body as you stuff.

Row 2: Work *2 SC* in each st around
Row 3: *Work 2 SC in first st, then 1 SC in next st* around
Row 4: *Work 2 SC in first st, then 1 SC in next 2 sts* around
Row 5: *Work 2 SC in first st, then 1 SC in next 3 sts* around
Row 6: *Work 2 SC in first st, then 1 SC in next 4 sts* around
Row 7: *Work 2 SC in first st, then 1 SC in next 5 sts* around
Row 8: *Work 2 SC in first st, then 1 SC in next 6 sts* around
Row 9: *Work 2 SC in first st, then 1 SC in next 7 sts* around
Row 10: *Work 2 SC in first st, then 1 SC in next 8 sts* around
Rows 11-20: *Work 1 SC in each st* around
Row 21: *Work 1 SC in next 8 sts, INV DEC* around
Row 22: *Work 1 SC in next 7 sts, INV DEC* around
Rows 23-24: Work 1 SC in each st around
Row 25: *Work 1 SC in next 6 sts, INV DEC* around
Row 26: *Work 1 SC in next 5 sts, INV DEC* around
Row 27: *Work 1 SC in next 4 sts, INV DEC* around
Rows 28-42: Work 1 SC in each st around
Row 43: *Work 1 SC in next 3 sts, INV DEC* around
Row 44: *Work 1 SC in next 2 sts, INV DEC* around
Rows 45-46: Work 1 SC in each st around
(Switch to face color)

With face color:

Row 47: Work 2 SC in each st around
Row 48: *Work 2 SC in first st, then 1 SC in next st* around
Row 49: *Work 2 SC in first st, then 2 SC in next st* around
Row 50: *Work 2 SC in first st, then 3 SC in next st* around
Row 51: *Work 2 SC in first st, then 4 SC in next st* around
Rows 52-56: Work 1 SC in each st around
Your face will get quite wonky, but it will circle out when you stuff it.
Row 57: *Work 1 SC in next 4 sts, INV DEC* around
Row 58: *Work 1 SC in next 3 sts, INV DEC* around
Row 59: *Work 1 SC in next 2 sts, INV DEC* around
Row 60: *Work 1 SC in next st, INV DEC* around
INV DEC around until hole is closed. Fasten off. You will have big holes in your work, but that is okay. You will be placing a hat over top so that will not show.

Eyes (Make 2 using body color):
Make MR/C, ch 1, work 4 SC in ring/circle. SL ST to first SC and fasten off.

Arms (Make 2):Row 1: Make MR/C, ch 1, work 6 SC in MR/C
Row 2: *Work 2 SC* in each st around
Row 3: *Work 2 SC in first st, work 1 SC in next st* around
Rows 4-6: Work 1 SC in each st around
Row 7: *Work 1 SC in next 3 sts, INV DEC* 3 times, work 1 SC in next 3 sts
(Switch to face color)
Rows 8-22: Work 1 SC in each st around

Hat and pom pom (Using I 5.5mm hook):
Row 1: Make MR/C, ch 2, Work 12 DC in MR/C, SL ST in ch 2
Row 2: Ch 2 in same st, Work 2 DC in each st
Row 4: *Work 2 DC in first st, 1 DC in next st* around
Row 5: *Work 2 DC in first st, 2 DC in next st* around
Rows 6-9: Work 1 DC in each st around. Fasten off.

Now, how to make a pom pom without a pom pom maker:
Cut a piece of your body yarn to be about 20″.
Loosely wrap body color yarn around your first 2 fingers 40 times.
Pull yarn from fingers, pinching in the middle.
Wrap your 20″ length yarn around middle of your pom pom yarn. Tie and knot tightly around yarn. You may knot 2-4 times. I did 4. You will use the rest of the tail to stitch your pom pom to your hat.
Cut your loops through their middle on each side and spread the pieces out.
Trim your strands so they are even.

Finally, attach pom pom to hat. Attach all other pieces to their appropriate places and you are finished!

I hope you enjoyed making this doll. I would love to see your photos if you make any from my pattern. Feel free to sell any dolls made from this pattern, just do not claim it as your own or try to sell it.

Striped Large Market Tote/Beach Bag Pattern

crochet large market tote slash beach bag

Materials:
– approximately 7 oz of worsted weight yarn, or cotton yarn
– 5.5mm I 9 crochet hook
– Stitch Markers
Notes:
– This pattern is worked with a ch 2 with increases until round 6. Afterwards you will work in a continuous round until you finish the body of the bag.
I changed color every two rounds. You can change color as often or less as you like. In my bag I made my strap the same color as my last round.
-This bag is 20″ tall (not including strap), 17″ wide, with a 32″ strap.

Chain 3.
Round 1: 12 dc into the first ch. Slip stitch to the top of the first dc. Ch 2. (12)
Round 2: 2 dc in each stitch around. Slip stitch to the top of the first dc. Ch 2. (24)
Round 3: *2 dc in the first stitch, 1 dc in the next* around. Slip stitch to the top of the first dc. Ch 2. (36)
Round 4: *2 dc in the first stitch, 1 dc in the next 2 stitches* around. Slip stitch to the top of the first dc. Ch 2 (48)
Round 5: *2 dc in the first stitch, 1 dc in the next 3 stitches* around. Slip stitch to the top of the first dc. Ch 2. (60)
Round 6: *2 dc in the first stitch, 1 dc in the next 4 stitches* around. Slip stitch to the top of the first dc.(72)

Beginning on round 7, you will be working in a continuous spiral. You will not join at the end of each round. Mark the first stitch of each round with a stitch marker. You don’t want to lose track of your place.

Round 7: Ch 3 (counts as first dc and chain 1). *dc, ch 1 in the next stitch* around until you get to the last stitch. In the last stitch, hdc, ch 1. At this point, you would normally slip stitch and chain. Since we’re working in spiral, you will work in the first chain 1 space you made at the beginning of this round. (72 dc, 72 ch 1 spaces)
Round 8: hdc, ch 1 in the first chain 1 space. *dc, ch 1* in each chain 1 space.
Rounds 9: *dc, ch 1* in each ch 1 space.
Round 10: dc in each ch 1 space. (Do not ch 1.)
Rounds 11-32: *dc in each dc* of previous row.
*Do not cut your yarn, handle will be worked in same color as last round (If you wish.)*

Now you will be working your strap. The *ch 2* works as your first stich.
Rows 1-44: *ch 2, dc in the next 12* stitches.
To fasten the other end of the strap to the bag: Count 40 stitches on the bag from the beginning of your strap.
Next, slip stitch into the next 12 stitches and fasten off. Weave in ends. Turn inside out so the strap blends.

I altered THIS PATTERN to make this bag. I would like to give credit to Daisy Cottage Designs for the original pattern.

I would love to see your bags from my pattern. I believe you can add pictures to the comments (maybe not), but if you can I’d love to see your work!

Single Crochet Preemie Cocoon

PhotoGrid_1425782798283

For this pattern I used Caron Simply Soft yarn and a G hook.

This pattern will fit a preemie sized <1lb-3lbs.

Ch-Chain
SC-Single Crochet
SL-Slip Stitch

Ch 6, join to first ch with a SL to create a circle
Rnd 1: Ch 2, Work 12 SC in circle
Rnd 2: Ch 2, Work 1 SC in same stitch (do this in each round), work 2 SC in first SC, then 1 SC in next SC, repeat around and join with SL to first SC
Rnd 3: Ch 2, Work 2 SC in first SC, then 1 SC in next 2 SC, repeat around and join with SL to first SC
Rnd 4: Ch 2, Work 2 SC in first SC, then 1 SC in next 3 SC, repeat around and join with SL to first SC
Rnd 5: Ch 2, Work 2 SC in first SC, then 1 SC in next 4 SC, repeat around and join with SL to first SC
Rnd 6: Ch 2, Work 2 SC in first SC, then 1 SC in next 5 SC, repeat around and join with SL to first SC
Rnd 7: Ch 2, Work 2 SC in first SC, then 1 SC in next 6 SC, repeat around and join with SL to first SC
Rnd 8: Ch 2, Work 2 SC in first SC, then 1 SC in next 7 SC, repeat around and join with SL to first SC
Rnd 9: Ch 2, Work 2 SC in first SC, then 1 SC in next 8 SC, repeat around and join with SL to first SC
Rnd 10: Ch 2, Work 2 SC in first SC, then 1 SC in next 9 SC, repeat around and join with SL to first SC
Rnd 11: Ch 2, Work 2 SC in first SC, then 1 SC in next 10 SC, repeat around and join with SL to first SC
Rnd 12: Ch 2, Work 2 SC in first SC, then 1 SC in next 11 SC, repeat around and join with SL to first SC
Rnd 13: Ch 2, Work 1 SC in each SC around, repeat for 37 rounds
Fasten off and weave in ends

Create a free website or blog at WordPress.com.

Up ↑